前言:
因为工作需要,研究electron和vue项目的结合使用,这里来将整理资料分享下
官网地址:入口
前提条件:
安装并应用了vue的脚手架,搭建了一个项目 ,教程入口
使用方法:(网速不好的小伙伴请直接看1.2)
一、安装electron
1.1、自动安装electron(不建议,这步是网上摘抄的,我用的是1.2手动的):
vue add electron-builder——————(安装electron)
在安装过程中,很可能会卡在这一步不动了:
node ./download-chromedriver.js配置选项,选择Electron的版本
? Choose Electron Version (Use arrow keys)
  ^4.0.0
  ^5.0.0
> ^6.0.0——————(这里选择electron的6.0版本)

***安装完成后,查看项目的目录结构,会自动在src目录下生成background.js并修改了package.json。
1.2、手动安装electron
(1)修改package.json,添加以下7行:
"scripts": {

+   "electron:build": "vue-cli-service electron:build",
+   "electron:serve": "vue-cli-service electron:serve",
+   "postinstall": "electron-builder install-app-deps",
+   "postuninstall": "electron-builder install-app-deps"

}
+ "main": "background.js","devDependencies": {
+ "electron": "^5.0.6",
+ "vue-cli-plugin-electron-builder": "^1.3.5",
},最终json效果:
{
  "name": "personbase",
  "version": "0.1.0",
  "private": true,
  "scripts": {
    "serve": "vue-cli-service serve",
    "build": "vue-cli-service build",
    "lint": "vue-cli-service lint",
    "electron:build": "vue-cli-service electron:build",
    "electron:serve": "vue-cli-service electron:serve",
    "postinstall": "electron-builder install-app-deps",
    "postuninstall": "electron-builder install-app-deps"
  },
  "main": "background.js",
  "dependencies": {
    "awe-dnd": "^0.3.4",
    "axios": "^0.19.2",
    "core-js": "^3.6.5",
    "electron": "^9.2.0",
    "js-base64": "^2.6.3",
    "js-cookie": "^2.2.1",
    "v-viewer": "^1.5.1",
    "view-design": "^4.3.1",
    "vue": "^2.6.11",
    "vue-pdf": "^4.1.0",
    "vue-router": "^3.2.0",
    "vuex": "^3.4.0"
  },
  "devDependencies": {
    "@vue/cli-plugin-babel": "^4.4.0",
    "@vue/cli-plugin-eslint": "^4.4.0",
    "@vue/cli-service": "^4.4.0",
    "@vue/eslint-config-standard": "^5.1.2",
    "babel-eslint": "^10.1.0",
    "eslint": "^6.7.2",
    "eslint-plugin-import": "^2.20.2",
    "eslint-plugin-node": "^11.1.0",
    "eslint-plugin-promise": "^4.2.1",
    "eslint-plugin-standard": "^4.0.0",
    "eslint-plugin-vue": "^6.2.2",
    "less": "^3.0.4",
    "less-loader": "^5.0.0",
    "vue-template-compiler": "^2.6.11",
    "electron": "^6.0.0",
    "vue-cli-plugin-electron-builder": "^1.4.0"
  }
}
(2)在src下新建background.js
源码:
'use strict'

import { app, protocol,view, BrowserWindow, Menu, ipcMain   } from 'electron'
import path from 'path'
import {
  createProtocol,
  installVueDevtools
} from 'vue-cli-plugin-electron-builder/lib'
const isDevelopment = process.env.NODE_ENV !== 'production'

// Keep a global reference of the window object, if you don't, the window will
// be closed automatically when the JavaScript object is garbage collected.
let win
// Scheme must be registered before the app is ready
protocol.registerSchemesAsPrivileged([{scheme: 'app', privileges: { secure: true, standard: true } }])

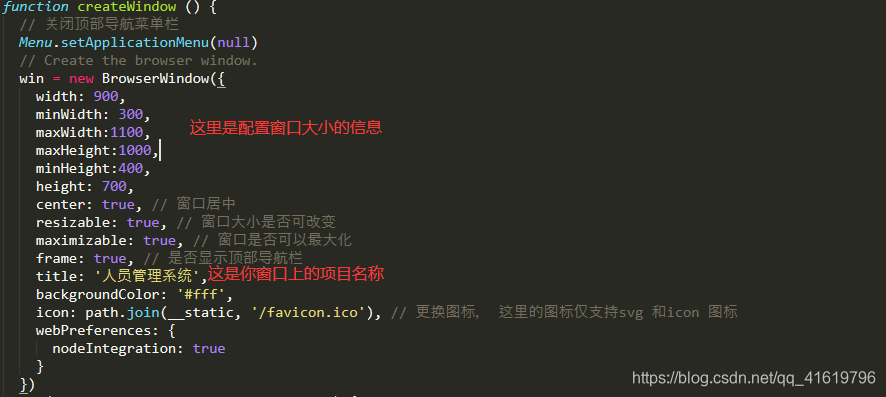
function createWindow () {
  // 关闭顶部导航菜单栏
  Menu.setApplicationMenu(null)
  // Create the browser window.
  win = new BrowserWindow({
    width: 900,
    minWidth: 300,
    maxWidth:1100,
    maxHeight:1000,
    minHeight:400,
    height: 700,
    center: true, // 窗口居中
    resizable: true, // 窗口大小是否可改变
    maximizable: true, // 窗口是否可以最大化
    frame: true, // 是否显示顶部导航栏
    title: '人员管理系统',
    backgroundColor: '#fff',
    icon: path.join(__static, '/favicon.ico'), // 更换图标, 这里的图标仅支持svg 和icon 图标
    webPreferences: {
      nodeIntegration: true
    }
  })
  if (process.env.WEBPACK_DEV_SERVER_URL) {
    // Load the url of the dev server if in development mode
    win.loadURL(process.env.WEBPACK_DEV_SERVER_URL)
    // 打开开发者调试工具
    if (!process.env.IS_TEST) win.webContents.openDevTools()
  } else {
    createProtocol('app')
    // Load the index.html when not in development
    win.loadURL('app://./index.html')
  }

  win.on('closed', () => {
    win = null
  })
  win.webContents.on('new-window', (event, url, frameName, disposition, options, additionalFeatures) => {
      event.preventDefault()
      Object.assign(options, {
        modal: true,
        parent: win,
        title: frameName,
        frame: false,
        width: 300,
        height: 400
      })
      // 创建新的窗口
     var a  = new BrowserWindow(options)
      a.loadURL(url)
      ipcMain.on('close-app', () => {
          // 通知关闭
          a.close();
          ipcMain.removeAllListeners('close-app')
      });
    // if (!process.env.IS_TEST) a.webContents.openDevTools()
  })
}

// Quit when all windows are closed.
app.on('window-all-closed', () => {
  // On macOS it is common for applications and their menu bar
  // to stay active until the user quits explicitly with Cmd + Q
  if (process.platform !== 'darwin') {
    app.quit()
  }
})

app.on('activate', () => {
  // On macOS it's common to re-create a window in the app when the
  // dock icon is clicked and there are no other windows open.
  if (win === null) {
    createWindow()
  }
})

// This method will be called when Electron has finished
// initialization and is ready to create browser windows.
// Some APIs can only be used after this event occurs.
app.on('ready', async () => {
  if (isDevelopment && !process.env.IS_TEST) {
    // Install Vue Devtools
    // Devtools extensions are broken in Electron 6.0.0 and greater
    // See https://github.com/nklayman/vue-cli-plugin-electron-builder/issues/378 for more info
    // Electron will not launch with Devtools extensions installed on Windows 10 with dark mode
    // If you are not using Windows 10 dark mode, you may uncomment these lines
    // In addition, if the linked issue is closed, you can upgrade electron and uncomment these lines
    // try {
    //   await installVueDevtools()
    // } catch (e) {
    //   console.error('Vue Devtools failed to install:', e.toString())
    // }

  }
  createWindow()
})

// Exit cleanly on request from parent process in development mode.
if (isDevelopment) {
  if (process.platform === 'win32') {
    process.on('message', data => {
      if (data === 'graceful-exit') {
        app.quit()
      }
    })
  } else {
    process.on('SIGTERM', () => {
      app.quit()
    })
  }
}
图示:

(3)cnpm i 安装所有的依赖,
直接安装报错:Error: post install error, please remove node_modules before retry!
把之前的node_model包删除了,重新安装即可
二、运行
npm run electron:serve
三、打包
npm run electron:build但是运行中,你一定会遇到这个页面
这里是因为你的依赖是从国外获取的,所以因为网络的原因,会卡在这里进行不下去,
解决办法:
1、打开 C:\Users\sdkj\AppData\Local
2、新建 electron-builder 文件夹
3、百度网盘获取Cache
链接:https://pan.baidu.com/s/1ZV6dq9L3QFU-epDUrifU0Q 提取码:7v0a


内容替换完成以后
在执行打包命令


这个就是你打包出来的文件,当然,如果你是在linux环境里面,打包出来的文件不是exe
此外:electron 打包速度慢的其他解决方法:
执行这个打包命令: ELECTRON_MIRROR=https://npm.taobao.org/mirrors/electron/ npm run packager
就是在你的命令前加ELECTRON_MIRROR=https://npm.taobao.org/mirrors/electron/及空格
更多参考文献:
1、https://www.jianshu.com/p/d2ab300f8a9a
2、https://segmentfault.com/a/1190000018533945 打包踩坑1
3、https://www.cnblogs.com/chenweixuan/p/7693718.html 打包踩坑1
以上就是本文的全部内容啦,有什么疑问欢迎在下方评论区留言嗷,收到通知会及时回复~
文章浏览总量:671 (非即时 )
